
Ok sorry for the wait on this one everybody! I know this writeup has been getting requested a lot and there's been a lot (and I mean a LOT) of interest in the files associated with it. If you're just here for the files, scroll down to the bottom of the page and ignore several months of my hard work and details that could potentially help you with your own personal build of these weapons. Now then, lets get this show on the road!
This build is Jinx's Arsenal from the insanely popular League of Legends. The three props included are Fishbones, the Shark Bazooka. Pow Pow the Rabbit Minigun, and Zzzap the Stungun. I apologize in advance for my lack of documentation towards the end of the build, con crunch crept in and stopping to take pictures is a thing that didn't happen, hopefully I can help fill in the blanks.
The Files.
All three props were to be Pepakura builds. In order to get Pepakura files, as none existed on the internet at the time, I had to rip the files straight out of the game myself manually. There's already a seperate write up I made previously that explains how to do that. Very useful if you intend on making props for another League Character.

Since League keeps all of their champions models in one file for animation purposes I had to cut ap
art the models and make some adjustments.
 Fishbones for example is in "backpack form" in the model, all scrunched up to make room for when Jinx has her Minigun out. The parts had to be rearranged and spread out to make them look like the normal size. This proved tricky as Fishbones is never the same size at any given time. His model stretches length wise with animation, it's incredibly obvious in her call back animations that Fishbones has some stretchy capabilities.
  Pow Pow also required some editing to the file in order to allow the barrel to free spin later. The circular portion that encompasses the barrels had to be made hollow and parts that clip inside one another for animation purposes had to be removed. I also took the liberity of saving myself time by welding the "hammer" portion onto the main body of the file since I had no intention of ever making that part animate myself.

Zzzap required the biggest changes of all of them, most notably to the barrel of the gun. I had planned on making the barrel a clear acrylic tube which would require it be perfectly circular. The gun from the game however is oval in shape. So I had to completely remodel the barrel of the gun. While I was at it I split the major sections of the gun into parts. This optimizes it for pepakura becuase you can make each part separate, sand them all to perfection, then assemble them. It saves a lot of time you would otherwise be sanding in tiny nooks and crannies.

Once the files were editing they were dumped into Pepakura and unfolded. This process is VERY time consuming and monotonous and was done twice on each model. The first time to get the initial parts separated, then a second time to make the fold line up in easier to hide spots and to get the scale correct.
Now I'm going to split up each build by the prop, but the process for the construction phase is essentially the same for all three.
Fishbones - Shark Bazooka
Fishbones was then printed out on card stock, cut and scored with an x-acto knife and glued together with lots of hot glue. The file was scaled to fit onto a 4 inch PVC pipe as the main body of the prop.


Fishbones is split into 4-5 separate pieces
The Muzzle:

The Head and Jaw:

The Midsection

and
The Tail Section:

All together the bazooka is roughly 4 ft long. As I stated before the length of Fishbones changes due to animation, so the length can be scaled to the height of the cosplayer if needed.


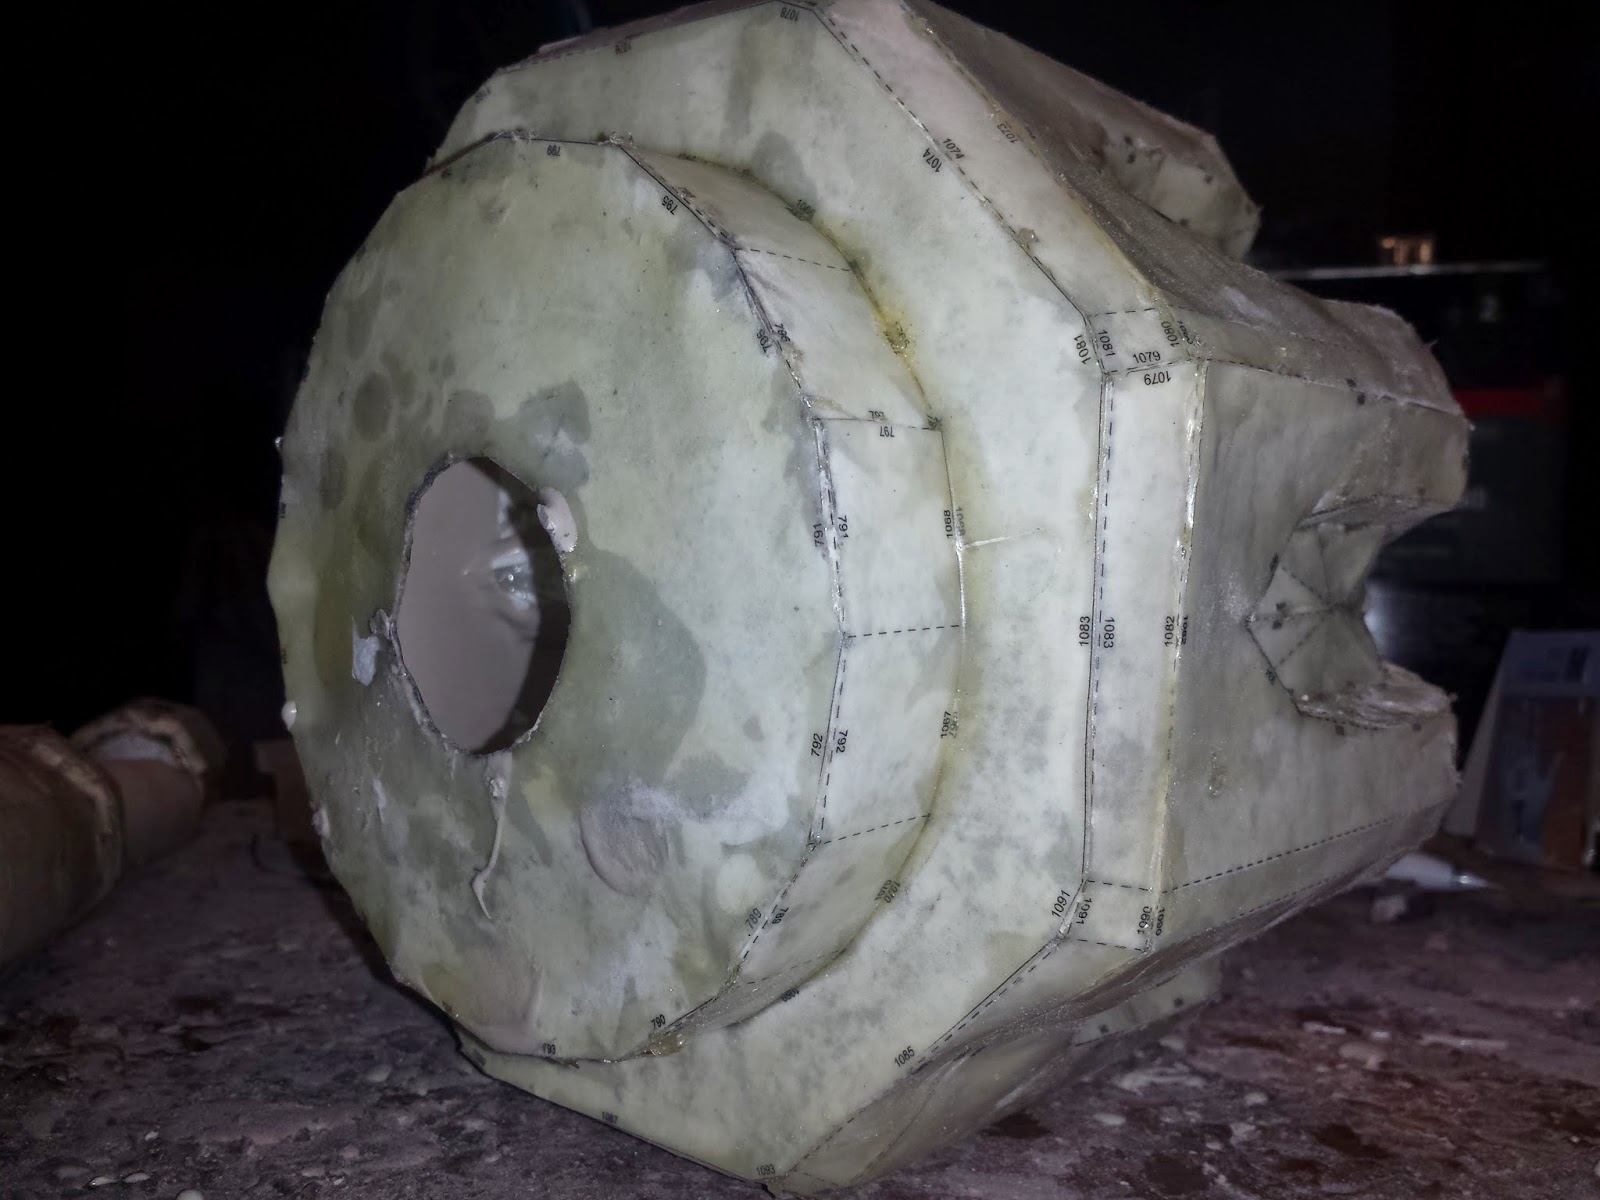
Once all the parts were folded and scaled properly they were brought out to the shop for fiberglass and rondo.

The fiberglass resin is painted on. one to two coats initially to keep the pepakura rigid. Once it rigid parts can easily be cut off of the pepakura with a dremil cutting wheel or even a knife if you have a steady hand.

All the parts are coated on the outside and some of the scrap and placeholder parts removed.
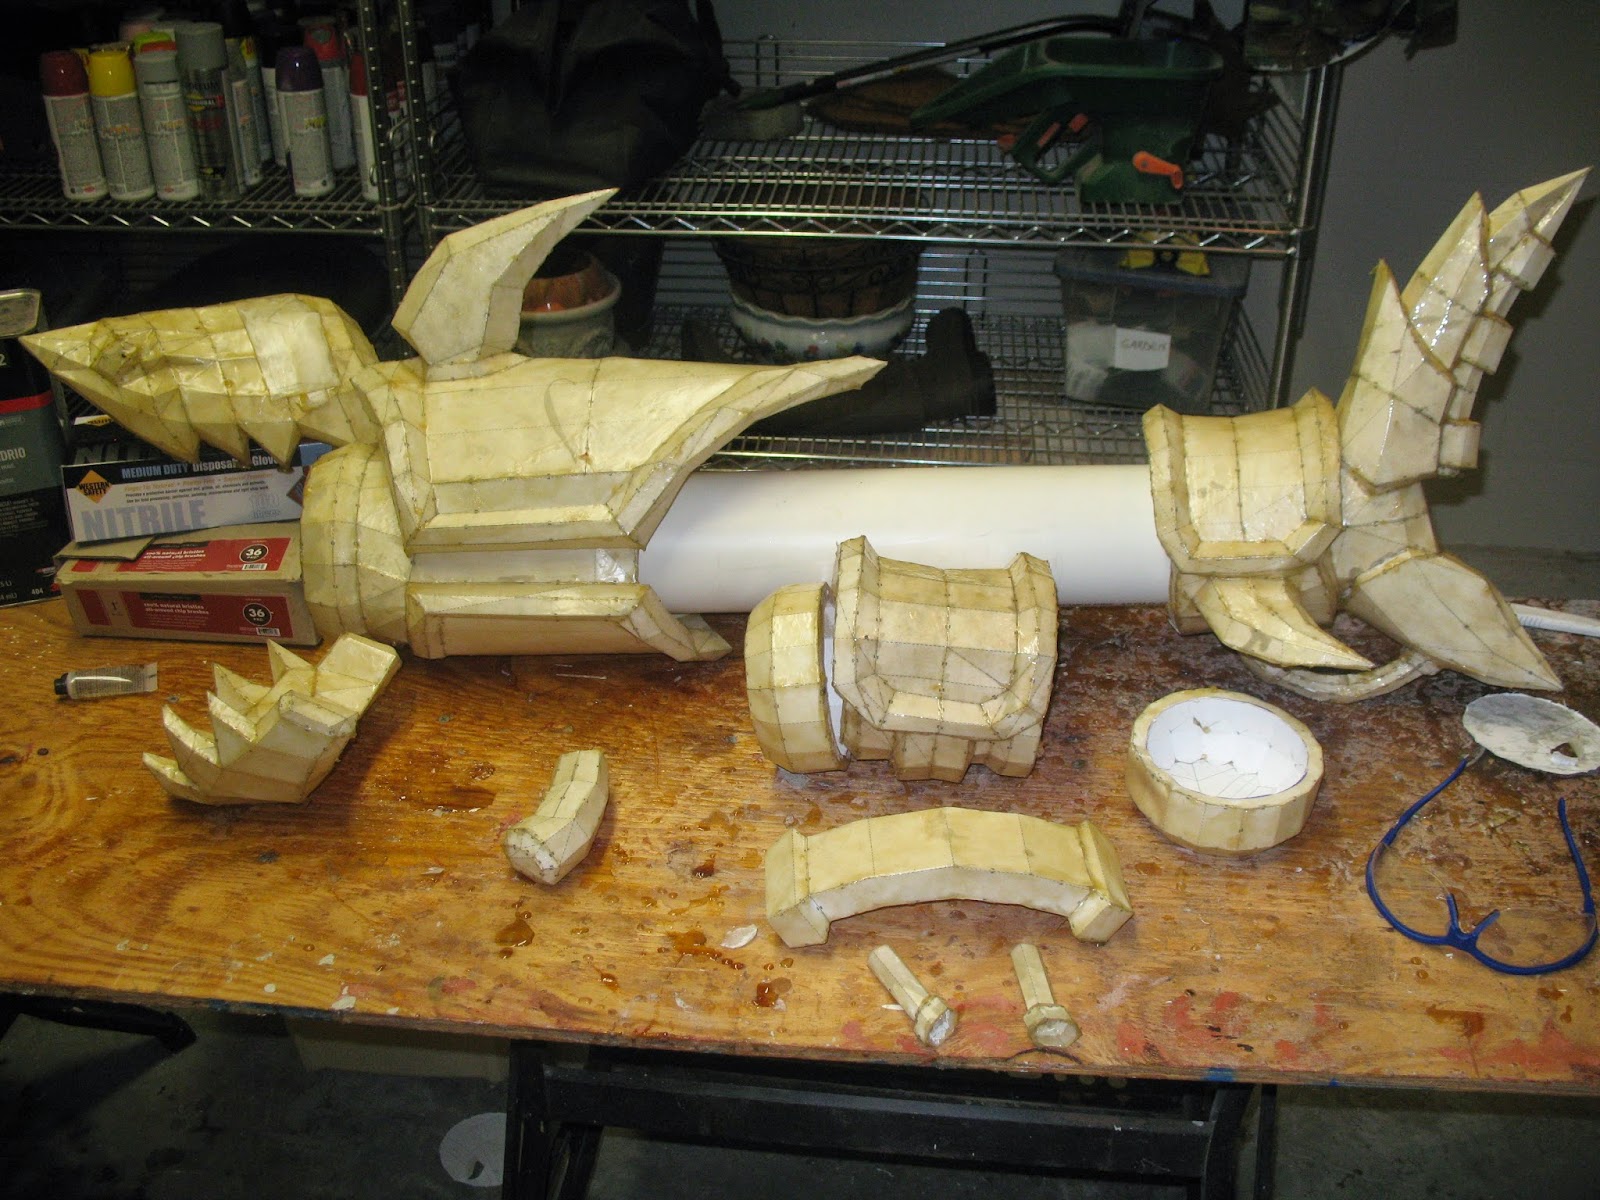
The midsection is made of 4 main pieces, the main body, two sections that are supposed to be main pipe that runs through the entire prop being tapered up, and finally the shoulder pad.


Circles would later be cut out of the two tapered ends and the main body of the midsection so I had to make sure they were solid before cutting or else they would crack. In order to do this I used Rondo. An explanation of what Rondo is and how to use it can be found in a separate writeup here.
 Once filled with rondo the parts were then sanded and made smooth. I kept adding rondo when parts got to thin.
Midsection assembled, you can see where there is some cracking that needs repair on the left side's taper.

Liking how the rondo worked quickly for the project I decided to pout it into every part and start sanding.
 All sections assembled, a little long though, I'll cut the pipe later once more work is done.

The Jaw's movement design I nick-named "The Jabber Jaw System" is fairly simple, a piston made out of wood would slide into the PVC pipe and attach to the handle. At the end of the piston are two bolts that connect to arm bars made out of wood (I'd suggest using metal as these broke on me several times during the build). Those arm bars connect to a bar that runs through the head and jaw. The head and jaw are also connected to the muzzle section by a separate bar. In order to mount those bars the tip of the muzzle section is filled with rondo.

 After a bit of trail and error the holes of both the head and jaw bars are drilled and I can begin playing with the puppetry motion.


In order for the jaws to completely close a rather large groove needed to be cut into the muzzle section. To determine how deep I closed the jaws completely and drilled through the holes of on the jaws and into the muzzle section. From there I drew a line of what the muzzle would most likely look like when I was done.

To remove such a large area of rondo I used up an ENTIRE belt of very coarse grit sand paper on my table sander. But it got the job done and it did it quickly. A bit of filling needs to be done, but nothing another pour of rondo wouldn't fix, in addition that same rondo pour would glue the pvc pipe to it's permanent home in the muzzle section.

With the groove cut the jaw closes completely now with plenty of clearance on either side.


The piston was made out of two 1" x 4" planks with a 1/4" thick plank wedged in between with grooves left for the handle to be slide into place and room for the arm pieces (also made out of 1/4" planks) to move.

The handles hole was an interesting problem, having to cut through the PVC pipe accurately and the pepakura above it. I decided to "spray and pray" and cut a hole rather wide then fill in the sides of the hole later. This ment not having to worry about if the handle was straight or not because I could twist the piston to be straight then fill the gaps later. At the end of the project the hole is only 1/4" wide. A lot of trail and error was involved in figuring out how long the hole had to be in order to fully open and fully close the jaws.
 A
A


Now that the puppet system is place it was time for a test. It was so much fun reaching this point in the project.
Some of the clunkiness in the video is because the piston can twist and there's not much leverage to push or pull against. Once the should pad is mounted and the gaps are filled it's fairly easy to move, it's even doable with one hand by using your fingers to grab the muzzle section like a trigger.
The head section was posing a bit of a problem though and I actually went through a second iteration of pepakura/rondo. The issue was that the holes around the bars for the piston kept snapping off. I eventually opted to make the head section out of EVA foam, using the same files as before but only printing out the top of the head I transfered the patterns on to EVA foam and glued it all together. EVA foam sands easier so it made getting a smooth shape very easy and made it easier to add details suck as the raised teeth and the grooves behind the eyes.


The eye grooves were inset by gluing EVA foam under a cut in the grooves shape then using apoxie sculpt to fill in the angled cuts.

Once all sanded down I used Plastidip (A rubberized coating similar to truckbed liner) to help seal the foam and make it ready for paint.

Every other piece on the build was essentially a grind of "Fill, Sand, Repeat". Most pepakura builds end up in this never ending cycle that only ends with either satisfaction that the prop maker being absolutely sick of looking at the thing. I use Bondo brando Glazing putty for most of my filler as it can be applied with your fingers, is able to sand quickly after application, and it's fairly cheap. It's no good on large sections though, for those larger dips, dents, or holes. I use straight up Bondo Body Filler. First start with coarse grit sand paper (60), then move on to finer and finer grits; 100, 150, then 220, or even finer if you're insane.

 Once I sand to 220 grit the parts are primed and ready to be assembled.
Then handle is the last section that needs construction. I foled the pepakura section for it, filled it with solid rondo, sanded it smooth, cut it in half with a hand saw (power tools seemed to dangerous), then glued either end to a plank of 1/4" wood that would slide up into the piston to move the jaw.

A few details are left in the construction phase, such as filling in the handle's gap by using a some card stock as a base then apoxie sculpt and a bit of bondo for the majority of material

I still had a little bit of twisting problems with the piston that caused the wooden arm bars to break several times. In order to compensate I used spacers made out of tubing, at a total cost of about 30 cents, it was easily the best investment on the entire project.
 The vent holes were drilled into the top of the muzzle section with a 1.5" drill bit.
Finally the should pad was filled with resin and screws were used to attach it to the mid section's main body.

Finally the entire prop was assembled and ready for lights and paint.


(note; the bars used to hinge the jaw were later cut short and the holes filled with apoxie sculpt for a seemless look)
The lights are easily the cheapest and the easiest thing I've ever learned to add to props, so expect more use of them in later props I make. I used THIS calculator to figure out what resistors I needed then went to dip micro for my materials. It literally costs only a couple of dollars after shipping, don't go to Radio Shack unless you're in a hurry, they're grossly overpriced.


The eyes have a clear acrylic covering that I sanded to make it look "frosted" then used a heat gun to curve it to fit in the eye. An array of about 8 red LEDS are mounted in the nose section to light up the mouth. It doesn't show very well in the day time, but for night time shoots? It will look amazing.

Credit for the painting on these suckers goes to my wonderful client and friend Hanari Cosplay. With the time crunch before the con she offered to help paint them and ended up doing such a better job than me I just let her do it all. It seriously looks amazing. I'll be adding more pictures once she gets a full photoshoot done, but I know a lot of you are waiting on this writeup so I'll leave you with just this one for now.

(Belt is missing in the photo as it was removed for the painting)
Pow Pow - Rabbit Minigun
Both Pow Pow and Zzzap were built during a crunch for time so I have substantually less pictures and a lot of the methods I use aren't the cleanest or best ways I could've or should've approached it. But in general Pow Pow follows much of the same steps as Fishbones. First fold the pepakura out of cardstock.


The ears were filled with solid rondo and then sanded down, it's very easy to reach a smooth finish when you use a solid filling. However the cost is weight, the final prop feels like it's made of bricks. But that's the price you pay for quickness! Another thing to note when filling parts with solid rondo, tap them to remove air bubbles, you can see a fairly large hole on the one on the right, a simple fix with some filler, but a step I wouldn't have had to make if I had just tapped my ears a few times!


My late night prop grind blunder is saved once again by Hanari Cosplay's painting skills. She even added a few details that I didn't have a chance to make myself! A smart me would get her to paint all my props!

Zzzap - "Stunderbuss"
Zzzap, like the other two was folded in cardstock then coated in fiberglass
Once it got it's fiberglass coating it was all filled with a heavy coat of rondo and sanded down.


The coil is made up of EL Wire, I bought four 9ft sections of EL Wire on Amazon for about $5 each plus shipping (The wire was on sale at the time, normally EL wire can run for $20 per 9ft section). This EL Wire would be wound around a PVC in the center and the wires would run out near the trigger and attach to the belt.


The two "Dynamos" are blue florescent light covers cut off and attached with Apoxie Sculpt. The caps of both are more Apoxie Sculpt rounded off . After this picture was taken they were sanded to be more smooth and the tubes were also sanded with a light grit sand paper to make them less see through or "frosted"
The main barrel and the coil were both mounted into the base of the gun by filling the start of the barrel with apoxie sculpt then pushing the PVC pipe/EL wire coil and the clear acrylic pipe into it Play-doh style. Zzzap was then painted gold and I added clear tubing to the back section. The effect when this thing is one looks REALLY nice in low light situations. Unfortunately most of the convention was in bright sun-light so we don't have many good pictures as of yet, I'll be editing this post once I get some more photos in.

REFERENCES
If you're looking to make your own Jinx props then look no further! I have a handy dandy bundle for you to download! It contains not only the .pdo files I used to make these props but also contains the .objs used to unfold them and the original jinx model I initially ripped from the game itself. So if you don't like my .pdo files I've already set you up with the files to do it better yourself. Read the readme file for details on what is in each file if you get confused.
DOWNLOAD
I've also got a bunch of handy reference pictures in an album on my facebook page. Tha album can be found here. Another great reference if you haven't discovered it already is LoL King's Model Viewer.
And finally I'd like to thank my wonderfully helpful client and friend Hanari Cosplay for requesting this build, helping me paint it, and being incredibly understanding to the hoops I had to jump through to get it done. She's a great cosplayer so please check her out, plus there's even more pictures of the completed cosplay on her page.
If you feel like I glossed over any details you'd like to know more about or if you have any questions about prop making in general just drop me a line on my facebook page: JD Builds or shoot me an email at: jdbuildsprops@gmail.com
Pepakura files Might pass us please
ReplyDeleteJust Amazing :D
ReplyDeleteI'm gonna try to make the fishbones !! ^w^
ReplyDeleteTheir work is very great , congratulations , I have a friend who I love very much and I want to build the bazooka shark and could not find the file, thank you very much
ReplyDeleteincredible work friend, but it would be nice to spend the file, I say to several they would like to do this cosplay accessory to win a girl XD
ReplyDeleteYou save my life with this post <3 the mechanism jaw is clear now. Thank u so much.
ReplyDeleteThis comment has been removed by the author.
ReplyDeletewow, your work its awesome!!!
ReplyDeletei can´t wait to use fishbones at the next convention!!! Ow^)b
Nicee work , amm
ReplyDeleteWhere can I find the patterns?
Wow, amazing block structure!Hhow long have you written a blog before? Working on a blog seems easy.
ReplyDeletePepakura Designer Crack
Passport Photo Maker Crack
Foxit Phantompdf Crack
Windows ISO Download crack
Wise Folder Hider Pro Crack